Manage Software Registrations EasilyMaintain control over your software application after deployment |
Regmanage2 is a Visual Foxpro application developed by IO Technologies Inc to aid clients in managing who has access to the software developed for them. Within Regmanage2, clients can add new licenses to use their product, generate trial keys, and browse the current registered users.
Key features include:
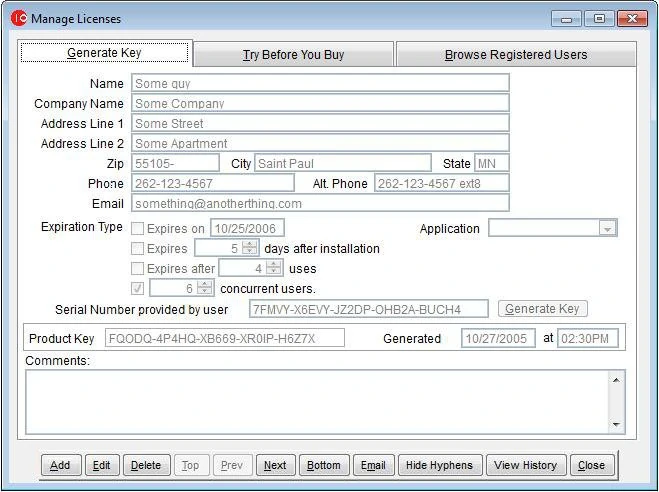
Generate Keys This is the first screen that is displayed when Regmanage2 is opened. It is here that you can add new licenses to the application for various users, the license type and manage the serial number associated with them. 
To add a new license, click the Add button located on the bottom left of the screen. Fill in the form with the appropriate information: A) The basic information of the person/company that the application will be registered to. B) The license information.
After the form has been filled in with relevant data, click the Save button located at the bottom left of the screen. Additional Information on the buttons located at the bottom of the screen:
Try Before You Buy Try Before You Buy is the second of the main tabs located at the top of Manage Licenses form. Use this tab to add new trial licenses to the application so that a user can try it before buying the full version. This form is like a stripped down version of the Generate Key screen. 
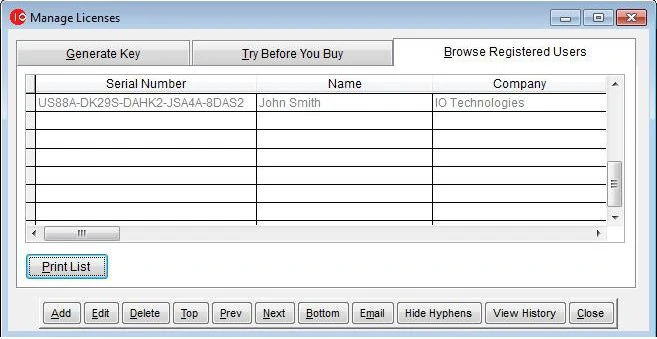
To add a new license, click on the Try Before You Buy tab located near the top of the form. Then select an Expiration Type and fill in the data field associated with it. This defaults to the Expires after option with 25 uses. Make sure the Application field is filled in or the trial license you are creating will not work! Finally, click the Generate Key button. This will generate a new trial key as well as active it. All that remains to be done is to be done is to distribute the trial key to the user. Browse Registered UsersBrowse Registered Users is the third of the main tabs located at the top of Manage Licenses form. It is here that you can view all of the users associated with the application. You can also sort the list in multiple ways including, but not limited to, by name and company by clicking on their respective column headers.
The applications which appear in the Applications dropdown on the main Regmanage form are maintained using the Manage Applications form. This form allows you to add/edit various applications that they want to be able to issue licenses for, as well as mark older outdated applications as inactive or even to delete them, though the latter is typically not recommended. 
To launch the Manage Applications form, click on Manage Licenses from the menu bar and then on Manage Applications. To add a new application to the list, click on the Add button and type in an application name, then click Save. By default the application will be flagged as active. Editing an existing application can be done in one of three ways:
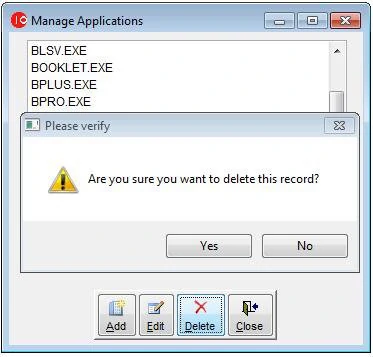
Press Yes to delete the record or No to cancel. NOTE: This action cannot be undone. For this reason it is recommended that the application be marked Inactive instead of deleted! |

|
I/O Technologies, Inc.N116W15830 Main St. STE 101Germantown, WI 53022-2603 800-993-9028 
|